About Me

My photo
I specialise in photographing moments of tenderness so I tend not to do posed portraiture and instead prefer to work unobtrusively at family gatherings

Friday, February 19, 2010

Evolving your sports photography


This blog is about how photographing my son and his team mates playing cricket has evolved over time.

When I began to photograph cricket, mainly to fill in time as I knew nothing about cricket and hadn't acquired the skill of staring at a grassy field for a day, I had no idea of what to photograph so I sought to imitate those cricket photos I had seen, conventional sports photography in newspapers. This meant I focussed on individual performance as per the photos below:

The batsman


The batsman


The fielder

The fielder


But over time this focus on individual performance became dull so my focus moved to the interaction between players beginning with that between the bowler and batsman, which resembled hatred at times, not something I had associated with cricket.


But this interaction became less interesting over time so rather than stop photographing, I became interested in the team's jubilation, the joy of boys in victory.


Which in turn lead to my interest in sadness in loss


I am not sure where to go now in my cricket photography - I could polish the existing themes or maybe focus instead on the spectators, the coaches or the post match shaking of hands. I do know that if I don't change the theme, I'll give up taking my camera to the games and that would be a shame because occasionally I will take a photo on the spur of the moment without any theme in mind such as this one.


Tuesday, February 16, 2010

How to turn your rough diamond photos into gemstones

You take your camera to your child's cricket because it's an important game and it would be lovely having a photo of the team triumphing on the day. The game is tense but suddenly all comes good and magically you are in the right spot at the right time, you take the photo and can't wait to get home to print it and send it to the other parents.

You get home and disaster - instead of a gem, your photo is a dud. Or is it?  To explain how to get the best of your photos,  this article will show what had to be done to a cricket photo to make it a 'keeper'.

Fixing your photos can be done in a variety of programs including Photoshop Elements, Picasa and iphoto. Whatever your chosen application, fixing photos is an easy five step process.

1. Decide what's important and crop out what's not.
2. Delete distractions from the cropped image
3. Fix the scene's white balance and colour
4. Fix the scene's brightness.
5. Sharpen the image

As evidenced below, this approach can be applied to any photo, from landscapes to group photos:
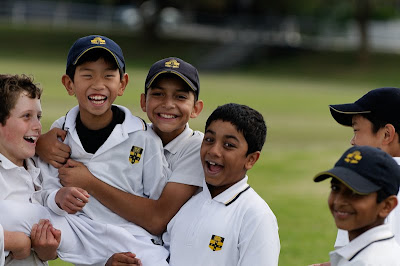
A Group photo before cropping, adjusting white balance and colour, brightening and sharpening 


A Group photo after cropping, adjusting white balance and colour, brightening and sharpening 


A landscape before cropping, adjusting white balance and colour, brightening and sharpening


A landscape after cropping, adjusting white balance and colour, brightening and sharpening 


Hopefully the above examples have convinced you that miracles can be achieved with your photos. So to help you with your own images, I'll explain how I have applied the five step process to improve a cricket photo.


Untouched image


Step 1: Crop the image  

 In the above photo the wicket keeper has caught out the batsman but you would never see this unless you peered closely because the image doesn't draw your attention to the wicket keeper. This is because there is too much irrelevant information in the photo such as the bare earth in the foreground, the white cone in the left middle ground, the blue bag in the right background and the cars in the left background. To remove these distractions you need to use the 'crop' tool in your chosen application which will result in the following image
 
Cropped image


Step 2:  Delete distractions from the cropped image 

Thanks to your cropping, you no longer see blue bags, cars and bare earth so you ending up seeing a lot more of the wicket keeper. You could obsessively delete anything other than the wicket keeper, beginning with the mother in the pink sweater sitting in the chair but sometimes background items give the image context. What doesn't, in my view, is the white cone to the right of the bowler so I'll delete it using the 'healing' or 'clone brush. Deleting this small object will make an enormous difference to how the viewer perceives the photo because the eye tends to go to the brighter parts of a photo and not in this photo automatically to the wicket keeper whose face is dark due to  his complexion and his helmet shading his face. 


Cropped image with local healing to remove white cone


Step 3:   Fix the scene's white balance and colour

The photo is drab because it was taken on an overcast day so colours look dull. 

To make it more interesting, you need to fix the white balance of the photo. White balance  is the process of removing unrealistic color casts, so that objects which appear white in person are rendered white in your photo.  Proper camera white balance has to take into account the "color temperature" of a light source, which refers to the relative warmth or coolness of white light.  Our eyes are very good at judging what is white under different light sources, however digital cameras often have great difficulty with this.

 To fix white balance, with the 'white balance' tool click on a neutral colour. In this photo, clicking onto the white shirt of the bowler works wonders as demonstrated below.

Cropped image with local healing to remove white cone and white balanced.


At this stage you should also consider the overall colour of the photo - increasing the saturation will give the photo more 'kick' as evidenced in the photo below.


Cropped image with local healing to remove white cone, white balanced and increased colour saturation.

Step 4:  Fix the scene's brightness

The photo still looks drab because of the flat lighting so you should play with the 'exposure', 'brightness' and 'contrast' settings (in that order) until the photo becomes punchy. There is no right or wrong way to do this, just small adjustments until the image looks better and remember, there is only so much you can achieve with a photo (you cannot turn night into day).


Cropped image with local healing to remove white cone, white balanced, increased colour saturation and adjusted brightness.

If your application has localised adjustments, you want to brighten the cricket ball and the wicket keeper's face to make the viewer's eye go to them (remember the eye prefers brighter parts of the photo and the wicket keeper and the cricket ball are having to compete with the white cricket shirts, trousers, socks and shoes. 


Cropped image with local healing to remove white cone, white balanced, increased colour saturation, adjusted brightness and localised brightness on cricket ball and wicket keeper's face.


Step 5:  Sharpen the image

The final step is to sharpen the image - too little and the image will be soft or 'mushy', too much and the image will be pixellated or 'scratchy'.


Cropped image with local healing to remove white cone, white balanced, increased colour saturation, adjusted brightness, localised brightness on cricket ball and wicket keeper's face and sharpened.

In conclusion, with a little patience, you can turn rough diamonds into gemstones following the five step process above.


Saturday, February 13, 2010

Using your DSLR - how to choose aperture, shutter speed and iso - Part 2 of 4 part series

The previous article in this four part series about moving beyond the  P Mode on your DSLR explained what your camera assumes about the quantity of light when being used in P or Program mode and that combinations of shutter speed and different apertures can result in the same amount of light reaching your DSLR's sensor.  This article explains how to choose the ideal combination of shutter speed and aperture. It also introduces iso which allows you to vary the sensitivity of your DSLR's sensor.

Imagine two very different scenes you want to photograph:  your son standing resolutely in the mountains, a backdrop of glorious scenery and your daughter dancing at a party, a distracting background of chairs and tables behind her. To help you with your imagination, here are two such photos:
In the photo of your son, the mountains behind are sharp whilst in the photo of your daughter, the distracting background are a blur.

What is your camera assuming about the importance of the background in P Mode so it can decide whether or not to blur the background? Your camera generally has no idea about what's in the background. Depending on the model, a camera may have thousands of images of scenes, and the ideal shutter speed and aperture for each of those scenes, stored in its memory and will try to match your scene with its memory so it can then impose the ideal shutter speed and aperture. This 'memory' approach can never match what you know about the scene. So once you have decided whether or not you want the background, how do you communicate this to your camera?

You control how much of the background will be in focus by changing the aperture of your camera. The larger the aperture (e.g. f5.6 instead of f11), the more the background will be blurred. In the two photos above, the boy's photo has an aperture of f16 whilst the girl's photo has an aperture of f4.

Why does your camera give you so many apertures when you only need f4 and f16? The answer is complex - aperture essentially affects the plane of focus or how much is in focus in front of and behind your subject and different lens lengths and your distance from the subject will affect the plane of focus. For the purpose of this article, which is written for anyone seeking to move beyond the P mode, use the largest aperture possible when wanting to blur the background and use either f11 or f116 when wanting to preserve details of the background.

But how do you change the aperture on your camera? The answer is to change your DSLR's command dial from P to A - A stands for Aperture priority and once you have done this, you simply dial in the aperture you want and the camera will automatically select the appropriate shutter speed. This sounds so easy and it would be if we didn't have to worry about shutter speed.  With a very small aperture, only a tiny amount of light is able to register on your camera's sensor which means you have to keep the shutter open for longer than you would if you had used a very large aperture. In the two photos above, the boy is stationery so the actual shutter speed of 1/180th sec is not a problem but the girl is dancing and had I used a shutter speed of 1/180th second, she would have been blurred; in actuality I used a shutter speed of 1/1500th sec.  So what shutter speeds will give you the best results?

If you are photographing a landscape, your shutter speed should be 1/60th of a second or faster (e.g. 1/250th of a second). If you are photographing a stationery person in a landscape then your shutter speed should be at least 1/180th of a second or faster. If you are photographing a dancing girl in a landscape then your shutter speed should be 1/500th of  a second or faster. If you want to be artistic when photographing a running girl and want her to be blurred, you should ensure the shutter speed is about 1/15th of a second as is the photo below.


Say you want to take a photo of your daughter dancing in the mountains. In Aperture mode, you select a very small aperture, say f11, to make sure the mountains behind her aren't a blur but disaster, your camera's read out indicates the camera has selected a shutter speed of 1/125th of a second which is no where near fast enough since it is 1/3 as fast as what you need (1/500th of  second is twice as fast as 1/250th second which is twice as fast as 1/125th of a second) so what to do? You could increase your aperture to f5.6 (remember from the first article that f11 lets in half the amount of light that f8 does which in turn lets in half the amount of light that f5.6 does).

But a f5.6 aperture would make the mountains blurred so what to do? Ask your daughter to stop moving and somehow make her dance in Photoshop when you get home? No, what you need to do is make your camera's sensor more sensitive to light - if you make it three times as sensitive, then at f11, your shutter speed will be what you want, 1/500th of a second.

But how to make your camera's sensor more sensitive? In the dark era before digital DSLR's, you would use a faster film in your camera. Films were rated on their sensitivity to light with an 800 ISO (ISO is also known as ASA) film being twice as sensitive as a 400 ISO film which in turn was twice as sensitive as a 200 ISO film. This meant that an 800 ISO film required only 1/3 of the light required by a 200 ISO film to register the same amount of light information on the film.

So why is this relevant in the digital era? Because you can easily change the sensitivity of your DSLR's sensor 'mid roll' so to speak. Going back to wanting to photograph your dancing daughter on the hillside, if your camera's ISO was 200 when you found out the camera selected 1/125th second when you selected f11, all you have to do is increase the ISO from 200 to ISO 800 and your daughter will be beautifully sharp as will be the mountains behind her.

So why don't cameras use a very high ISO  all the time?  The faster the camera's ISO, the more 'noise' there is - little dots start appearing in the darker or shadow areas of the picture where there shouldn't be any dots and this isn't aesthetically desirable. Furthermore, sometimes you want a combination of slow shutter speed and small aperture - the above photo was taken at f19 using 1/15th second for shutter speed.

In summary, for a given ISO, a large aperture will blur the background and require less light than a small aperture which will preserve detail in the background but require more light. Increasing the ISO will make your DSLR's sensor more sensitive to light which will then allow you to use an appropriate shutter speed for a desired aperture.

The next article will explain how your camera focusses in P mode and what you need to know toensure your subject is perfectly in focus.

Thursday, February 11, 2010

How to choose a wedding photographer

A couple faced with choosing a wedding photographer enters a world which should be fun but rapidly becomes daunting. Every photographer they visit shows them a majestic leather bound tome in which the perfect couple looks stunning. With nothing to distinguish one photographer from another, the couple asks the photographer if the photographer is discrete and into candid photography because they hate posing. “Of course”, each photographer responds. So without staging a wedding rehearsal to test each photographer ,how do you choose a wedding photographer? On price?
I think the main question to ask yourself is do you want fairytale photography or photojournalism? The former focuses on the material symbols of weddings such as the couple as an ideal unit, the rings, the bridal party and  the dress whilst the latter is about candor, images not necessarily technically perfect but capturing the wedding as it actually was. 
A fairytale photographer might criticise the photojournalist as being all substance with no style whilst the photojournalist might criticise the fairytale photographer for being all style and no substance.
A great example of a fairytale wedding photographer is Yevant, a brilliant Melbourne based wedding photographer. In my view, the following photo by Yervant (www.yervant.com) is stunning. The lighting is intriguing, the composition  classic and the use of the building to frame the couple perfect. Interestingly, the groom's face is partially hidden and this is most likely because males are generally far more awkward than females about posing so the photographic compositional trick is to 'bury' them. The female in this portrait also has her eyes shut - possibly in rapture or is it because Yevant wanted to avoid the wariness that is often found in normal (i.e. not a professional model) peoples' eyes when they are asked to pose?


However, as a wedding photographer  I don’t aspire to take this type of photo because it is a posed image and does not focus on what I consider to be the most important quality of my photography which is capturing tenderness.

A great example of a wedding photojournalism is the renowned English photographer Jeff Ascough (www.jeffascough.com) whose photo is below. 


With  photojournalism wedding photography, the couple may not look deeply into the camera, there may not be perfect lighting but the photo is unmistakably that of a wedding and chances are the couple will remember how they felt at the time when they see the photo.  My only criticism of this photo, based on the groom’s grin, is that he has either been asked by the photographer to pose, or knows the photographer is there. Like Yervant's photo, the couples' eyes are shut.
I personally prefer wedding photojournalism to fairytale photography because for me, the photo’s worth is less dependent on the material surrounds and therefore is more humanistic. 
My wedding photography style is a variant on photojournalism in that I am endeavouring to capture a wedding by photographing the unique emotions present on the day, those which can never be repeated. The following photos for me exemplify my photography.


In the first image, the surrounds aren’t opulent but the mood is overwhelmingly tender - a father is farewelling his son as a single man and the son is deeply grateful for everything his father has done.


In the second image, the image is posed but has an intimate feel and uses soft afternoon light.


So perhaps there are as many types of wedding photographers as there are reasons for marrying and you may need to understand why you are marrying in order to work out which photographer will meet your expectations.
Once you have decided what style of photography you want, make sure you are happy with how the  photographer responds to the following questions before you engage him or her.
Will you be the photographer on the day? Some studios may outsource photography and this may be disconcerting if the first time you meet the photographer is on your wedding day.
When will my wedding album be ready? Some studios only want to focus on signing up clients and taking photos in the ‘wedding season’, preferring to prepare albums in the quieter winter months so if you don’t want to wait six months, ask the studio to commit to a delivery time that meets your expectations.
When will my wedding photos be viewable on line? For friends and loved ones overseas, they want to see your photos sooner than later and anything more than three days may be too long for you.


Wednesday, February 10, 2010

Using your DSLR beyond the P mode - Introduction - Part 1 of 4 part article

You bought your DSLR because you wanted more than a point and shoot camera but faced with a plethora of options on the camera’s command dial (A, P, M, S......) and wanting to play safe for important photos, you opt for the P or Program mode.

But this irks you as the camera sometimes gets it wrong and you never quite know when a great shot will turn into a blurred or out-of-focus disaster.

So what to do? Should you have bought a more expensive camera that presumably has a more reliable P mode? No - the answer is to transfer decisions from the camera to you and this four part series of articles will  explain how to make this transfer process as painless as possible.

First of all, what is the P mode? Your camera is blind to the world and has to make a lot of assumptions about it including how much light is out there, where to focus, how fast your subject is moving and the ideal depth of field (or how much in front and behind your subject should be in focus e.g. 2 metres in front and behind the subject or. as much as possible). Switching your camera to P mode means the camera has to make the best ‘guestimate’ it can for all these unknowns.

Why does the amount of light matter to your camera? Think of your own eyelids and how each of your eyes has an iris. When it’s a very sunny day you tend to squint and your irises expand to protect your retinas. Conversely, in a gloomy room, you open your eyelids as wide as possible and your irises contract.

Your eyes irises and eyelids vary the amount of light because your retinas like a certain amount of light to register information - too little light and your eyes only see limited information, too much light and your retinas are overloaded and you see nothing. Your camera’s sensor is the monocular equivalent of your retinas - the place where information about light is registered, and just like your retinas, the DSLR’s sensor likes an ideal quantity of light. Unlike your eyes, your camera has no eyelid or iris to regulate the quantity of light. Instead the camera controls light by varying the shutter speed and aperture.

Two new terms, shutter speed and aperture, deserve an explanation. Think of a shutter as a primitive eyelid for your camera, primitive in that the shutter is either open or closed and cannot be anything in-between. When you take a photo, the shutter temporarily retracts so light can come through the lens and register on your camera’s sensor. The longer the shutter retracts, the more light hits the sensor. In a bright room, you only want the shutter to retract for a short time or the sensor will be overloaded. In a dark room, you want the shutter to retract for much longer to give your camera’s sensor enough time to register the far dimmer light. The typical shutter speed is 1/125th sec which means the shutter temporarily retracts for a tiny fraction of a second but most DSLRs' shutter speed ranges from 30 seconds to 1/4000th of a second. A later article in this series will later explain why you would want to vary shutter speed.

Now you know what a shutter does, where does aperture fit in? The aperture is the iris of your camera. It is physically part of your camera’s lens, it is usually octagonal and it restricts light by expanding and contracting.

Unlike an iris, an aperture has a ratings system e.g. f5.6, f8, f11. What does this mean? The ‘f stop’ rating simply explains how much light is let in by the aperture using a scale where f2 lets twice as much light as f4 as f5.6 lets twice as much light as f8 which lets in twice as much light as f11.... This is a confusing scale - just remember, the smaller the aperture (e.g. f4 instead of f 11), the more light is let in.

In summary, a DSLR controls how much light registers on the camera’s sensor by varying the size of the aperture and by varying the time the shutter retracts. It stands to reason that different combinations of shutter speed and aperture will result in the same amount of light reaching the sensor.

For example, if your sensor needs a shutter speed of 2 seconds and an aperture of f8, if you double the shutter speed to 4 seconds (which will let twice as much light in), then you need to change the aperture from f8 to f11 in order to halve the amount of light let in by the shutter.

Before you worry about what combination of shutter and aperture to use, you need to work out how much light is required by your DSLR’s sensor. Cameras have built in light meters to measure the prevailing light condition but they have to make an assumption about how much light is being reflected from the objects you want to photograph. Why? The camera’s light meter measures light that is being reflected from your choice of subject and the general environment around your subject. However, the camera’s light meter cannot know the reflectivity of your subject matter so it has to assume that overall, your subject reflects as much light as a light grey (known as “18% gray”)  piece of paper and this assumption works for the majority of subjects.

To understand why this assumption isn’t always appropriate, imagine three tennis balls, one is white, one is grey and one is black.

Let’s assume the white ball is three times as bright as the black ball. In other words, the white tennis ball reflects three times as much light as the black ball. Now let’s imagine what your DSLR assumes when you aim your camera at the white tennis ball. Does your camera assume it is a black tennis ball in a very bright room, a white tennis ball in a very dark room or a light grey tennis ball in average lighting.? Faced with these three options, your camera assumes the tennis ball is light grey, whether it is in fact white, black or grey.

In order to make a white tennis ball a grey tennis ball photo, your camera will underexpose the photo i.e. it will speed up the shutter speed from say 2 seconds, to 1 second so that the sensor is only exposed for half the time it should be.

In order to make a black tennis ball a grey tennis ball photo, your camera will overexpose the photo i.e. it will slow down the shutter speed from say 2 seconds, to 4 seconds so that the sensor is exposed for twice the time it should be.

If this is all a bit too theoretical, think about photos you have taken that were incorrectly exposed. A classic example is snow - instead of pristine white landscapes, your pictures have dull ‘sooty’ snow because your camera didn’t know that the scene’s overall reflectivity wasn’t light grey but much brighter so it exposed the focus to make your snow light grey!.

The next article will explain how to choose the ideal combination of shutter speed and aperture.