About Me

My photo
I specialise in photographing moments of tenderness so I tend not to do posed portraiture and instead prefer to work unobtrusively at family gatherings

Monday, September 21, 2009

Should a photographer refuse Indian weddings when they aren’t in a maharajah's palace in Rajasthan?

I was asked to photograph an Indian wedding that was organised very quickly, within a week; an auspicious day not to be missed meant very little planning so when I drove to the venue in Sydney on the wedding day, I had no idea of what to expect though I doubted it would be a magnificent maharajah's palace since there aren’t any in Sydney's suburbs!

The venue turned out to be a brick house. At this point I could have jumped up and down, outraged that the venue wasn’t even a temple but rather than take on reality and lose, I did what all professional photographers do and looked around for opportunities.

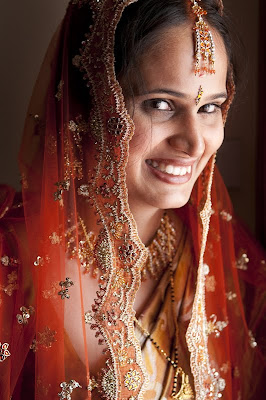
Where to photograph the bride? The house’s front door had a glass decorative panel and since the house faced North East, I was able to take advantage of the morning sun streaming through the door’s glass panel. The location wasn’t ideal – a light switch threatened to feature prominently in any photo, the glass panel was at chest height meaning anyone wanting to take advantage of the ideal 45 degree light would have to ask the portrait sitter to crouch down and even worse, it was the front door which meant I couldn’t have an elaborate set up or the guests wouldn’t have been able to enter the house. So what to do?

Here is a “location shot” to give you some idea of what I was faced with.


Below is the final photo, taken within 5 minutes of this location photo – no flash has been used, both sides of the bride's face are illuminated because I took advantage of the lighting reflecting off the walls and most importantly and the bride is not apprehensive or impatient because I worked quickly. I showed the bride the photo immediately afterwards and from then on, any doubt the bride might have had about whether I was able to photograph her at her best disappeared.


The wedding ceremony was housed in a mini tent that was within a marquee in the back yard- it would be safe to say that the natural light was dismal, no beautiful 45 Degree light, just dull light struggling to get though two layers of canvas.

Here is the location shot of what I was faced with:


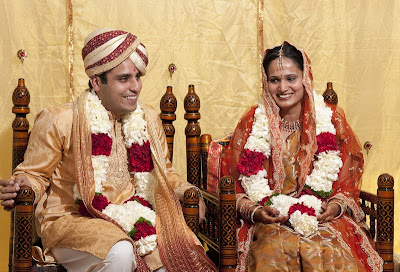
The location shot is slightly misleading because the mini tent is illuminated since I had placed a flash in the mini tent’s ceiling that fired upwards into its ceiling via remote control (no messy wires tripping up the guests). This turned the humble mini tent into a Bollywood film set. Having the flash fire into the ceiling also meant the wedding couple weren’t being blinded by direct flash. It also meant that I could move around and photograph the couple from various angles knowing that the front of their faces would always be exposed.

Below are some examples :


I wanted to take photos of the couple from the side. Since the bride was sitting in a chair next to the groom, I was faced with deciding who was going to be blurred, the bride or the groom. But rather than make such a decision, I photographed firstly the groom, then the bride and when I got home, I merged the two images to get the couple both beautifully sharp.

Here is the before photo of the bride that was used to make the final image.


Here is the final image showing both bride and groom in perfect focus:


I also took candid shots of the guests. In my experience men are far more difficult than women to photograph so the secret is not to let them know you are photographing them which means no poses and no flash: here are two candid images:


After the wedding ceremony, I took advantage of the lighting set up to photograph the family in the mini tent:


But how to cope when the couple left the mini tent to mingle with their guests in the marquee? I abandoned the flash and took candid photos making sure that the white canvas walls of the marquee did not confuse my camera’s exposure. Then, when I got home, I brought out the magic of the images but altering their exposure and tonality.

Here is a before and after photo of the couple greeting a guest where I have deliberately ‘blown out’ the scuffed walls of the marquee and its plastic window so nothing detracts from the warmth of the greeting.


I then took photos in the house. The living room had a lovely plain white wall and white ceiling so I asked one guest to point the flash at the side wall whilst fired my on-camera flash into the ceiling. This enlarged the apparent light source to give a lovely soft feel to the portraits since the light wraps around the face using this lighting technique. In short, I turned a living room of a suburban house into a professional light studio within two minutes. Here is one image from this 'studio':


In conclusion, I was able to take great photos because I never tried to fight reality. I accepted the location for what it was, a house in suburbia, and then worked out how to best capture the wedding day. To see more photos from the day, click on the link: http://www.johnslaytor.com.au/slideshows/celebrations/hindu_wedding_sydney/index.html

Friday, September 18, 2009

A review of four on-line photobook publishers available in Australia

I have developed a funeral photography business www.thefuneralphotographer.com.au. Integral to my service offering is the Memorial Book, a photo book which contains images of the funeral service, hobbies and objects special to the deceased such as their garden and objets d’art.


For two years I have used Asukabooks but became disillusioned with them. Whilst the quality of their books is superb (I rate them eight and half out of ten, with Asukabooks losing half a mark because of barcodes), I had six complaints.

Firstly my biggest gripe was that Asukabook did not provide book publishing software which meant that I had to generate the books within Adobe Photoshop. Whilst I developed a good system using Smartobjects within Adobe Lightroom, it was no substitute for dedicated software. It meant a book took up to fifteen hours to design and one that could never be modified in front of the client as the process was too cumbersome. Asukabook does offer dedicated software which looks glamorous but is very simple- being in its first edition, it lacks sophisticated options if one compares it to Momento’s software. I understand that Photojunction offers unofficial support for Asukabooks but I could see myself getting caught between these two companies and wearing the cost when something went wrong with a book design. I am also unfamiliar with Photojunction, a process not helped by its own website video tutorials not working for three days when I was interested.

My second complaint was that there was no pricing transparency. I would upload an order and within days my credit card would be debited. I would only get an invoice when I received the final product and the invoice was wrong more than once, once I had been overcharged by more than $150.

Thirdly, the page margin for error resulted in one book being unusable because the text had been cropped notwithstanding that it was within the safety margins of the page template – Asukabooks subsequently advised me that I could not rely on the safety margins of the template it provided and always had to allow for an additional ¼ inch. Asukabooks did not offer to reprint the book free of charge.

Fourthly, there were no volume discounts, even when I ordered 14 copies of one book and it seemed unfair given my own client’s expectations.

Fifthly, I hate the fact that Asukabooks insists on a strange barcode being both on the back cover and on the back inside page. In my opinion, this compromises the book cover design and looks ugly.

Sixthly, Asukabooks forces you to work in multiples of ten pages. So if you want to have a 42 sided book, you have to pay for fifty sides and put up with 8 blank sides.

So with these reasons, I started to look around and accepted that I might have to use Windows software (I have always used a Mac).

I first tried Click-on-Print http://clickonprint.com.au/ . Its Windows only software was easy to use and I had no problems sitting down with a client and substituting images and modifying page designs.

The software’s major weakness was that I wasn’t able to vary the opacity of images. For example, if I wanted a background image muted by reducing its opacity to 20%, I couldn’t do it within the software and instead would have to create the image within Adobe Photoshop, reduce the opacity, save the image and then transfer it from the Mac OS to the Windows OS. Needless to say this discouraged me and when I asked Click-on-print if they were likely to introduce opacity modification for images in their software they replied they had no plans to do so at the present time.

All in all, I thought the software ranked about seven out of ten. It encouraged me to play with page layouts.

In my opinion the quality of the Click-on-print books was four out of ten. Whilst the colour accuracy was good, the books suffered as follows.

Firstly, there was hideous warping on the inside covers presumably from excess glue.


Secondly, the side of the pages seemed to be smudged with ink lines.


Thirdly, the pages were warped


Fourthly, the glossy front cover seemed excessively vulnerable to scratching.

Fifthly, you could see the stitching in the centre of the pages when the book was open.

Click-on-Print gladly offered to reprint the books when I raised these problems but the subsequent reprints weren’t much better in my opinion.

I rate the Click-on-Print book four out of ten.

Next I tried photobookaustralia.com.au. Its software was good (I rate it seven and a half out of ten), available for both Macs and Windows.

I was able to create a book within four hours which I thought was great. I also like the fact that you could create new page templates and save them. My main gripe with the software was that once the book was converted into a pdf file ready for uploading, I couldn’t review it for errors as the software repeatedly crashed . Photobookaustralia made suggestions about how I could rectify this situation but they didn’t work.

Unlike Momento, the software doesn’t generate a mini PDF (ie a file under 10 mb) of the final file which made it difficult to share with clients; I would have to shrink the software generated pdf within Adobe Acrobat but I am yet to do this as I don’t have Adobe Acrobat. Unlike Momento you get penalized timewise when laying out pages if you don’t decide on the layout before you select the images for the page.

The ordering process was excellent – it was easy to understand various options and place my order. I also liked photobookaustralia’s tracking system which kept me informed.

When ordering the book, I chose 6 ink printing and 170 GSM satin paper.

I was pleased with the results when I received the book. The colour was spot one, the sharpness of the images perfect and I liked the smart look of the black inside covers (every other book publisher has standard white inside covers which isn’t as good in my opinion; some charge extra if black inside covers are required). I was thrilled that photobookaustralia doesn’t insist on barcodes anywhere in the book unlike every other publisher mentioned in this article.

My three gripes were that the pages were slightly rippled (unlike those of Asukabook or Momento which are dead flat), it wasn’t possible using the software to generate text for the spine (I would have had to do this in Photoshop using a template cover page and upload it separately for no additional charge) and the cover didn’t feel as durable as those of Asukaboks or Momento. Interestingly, photobookaustralia subsequently advised me that they have discontinued satin book covers since they aren’t very durable. I rate the book eight out of ten.


Finally I tried www.momentopro.com.au. Its Windows only software is excellent, very stable now in its 5th edition and the momento software encourages experimentation since you can easily drop images onto a page without worrying about how they will be placed (one of my gripes about photobookaustralia’s software). My first gripe with Momento’s software was that I couldn’t save page templates so I was forced to use those provided in the software. My second gripe was that I had to generate each page which gets tedious if making a seventy page book My third gripe is that the software cannot generate images on the back cover – for a $20 premium I could submit a jpeg image to rectify this but it seemed silly. I rate the software eight and a half out of ten.

The software was very stable once I had conformed to its requirements. Firstly, when numbering images, make sure you have a three prefix numbered system e.g. Image001, image002 otherwise the software sorts them as follows image10, image100, image101, image 11…

Secondly, if you have the same image names but in different folders, the program cannot cope and scrambles page thumbnails.

The ordering system is good though not in the same league as that of photobookaustralia.

I was disappointed when I received the book. In my opinion the colour space of the front cover was seriously wrong, skin tones were unduly pink. The colorspace of the pages was fine though the satin paper, whilst it lay beautifully flat, had a dead feel to it unlike photobookaustralia’s satin paper. Some of the pages also had tiny grey spots on them. It was also annoying to have a barcode on a page of its own at the back of the book (which also looks odd, as if I have made an error), particularly since a Momento staff member assured me there weren’t any barcodes. As a result of the above, I rate the book seven out of ten.

In conclusion, in an ideal world I would use Momento’s software albeit with photobookaustralia’s ability to save page templates and create back pages to generate a book with Asukabook’s cover and book size offerings (e.g. 7” x 7”) but using photobookaustralia’s inside black coverss which would then be presented in the hard plastic book sleeves provided by Asukabooks. Because I live in the real world, I have selected photobookaustralia as my preferred book supplier.